Jewish Baking
1/8/2022 | 27m 15sVideo has Closed Captions
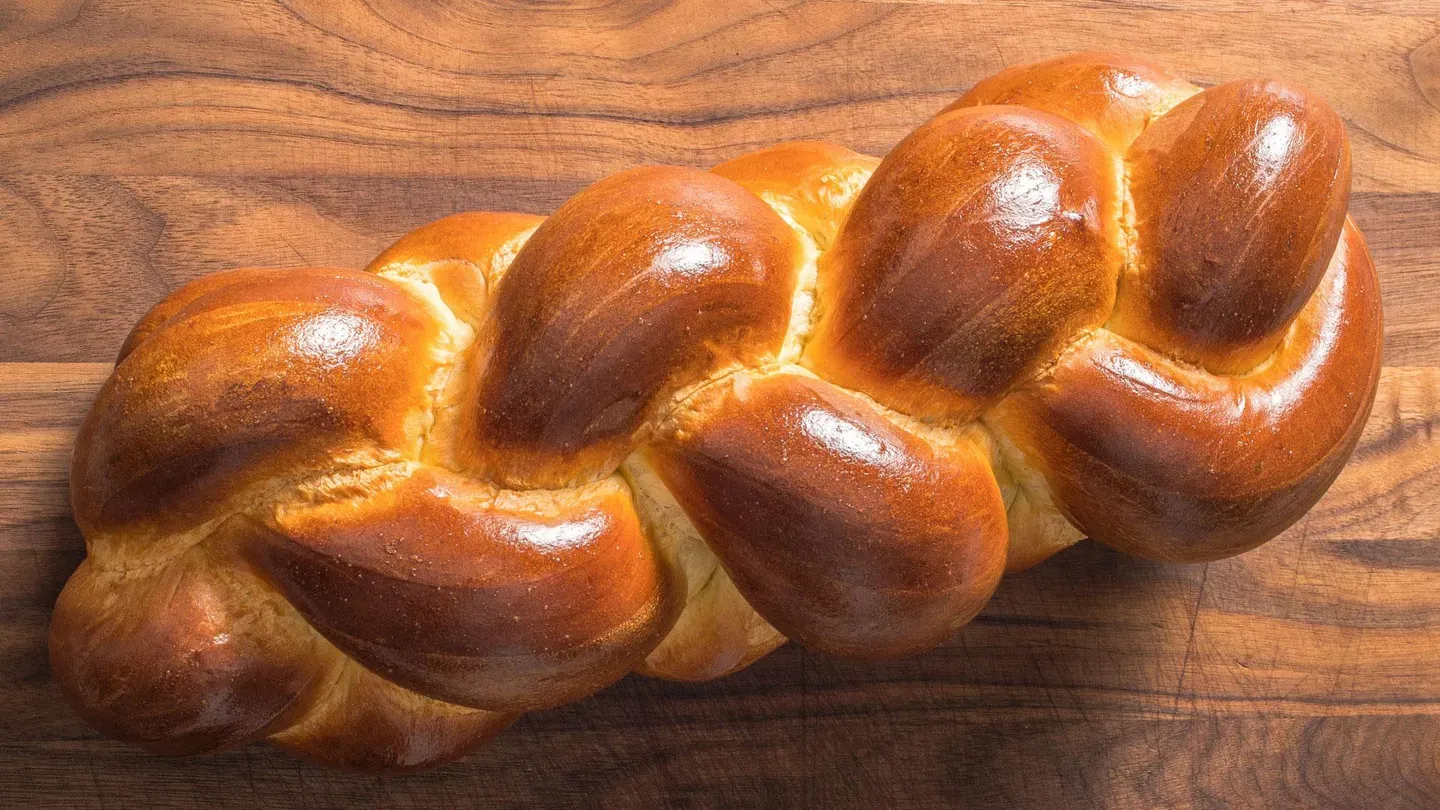
Easy-Braid Challah, Raisin-Walnut Filling Crescent-Shaped Rugelach and a flour primer.
Test cook Lan Lam makes host Bridget Lancaster Easy-Braid Challah. Testing expert Jack Bishop gives a flour primer. Test cook Erin McMurrer and host Julia Collin Davison make Crescent-Shaped Rugelach with Raisin-Walnut Filling.
Problems playing video? | Closed Captioning Feedback
Problems playing video? | Closed Captioning Feedback
America's Test Kitchen is presented by your local public television station.
Distributed nationally by American Public Television
Jewish Baking
1/8/2022 | 27m 15sVideo has Closed Captions
Test cook Lan Lam makes host Bridget Lancaster Easy-Braid Challah. Testing expert Jack Bishop gives a flour primer. Test cook Erin McMurrer and host Julia Collin Davison make Crescent-Shaped Rugelach with Raisin-Walnut Filling.
Problems playing video? | Closed Captioning Feedback
Where to Watch America's Test Kitchen
America's Test Kitchen is available to stream on pbs.org and the PBS app.
Providing Support for PBS.org
Learn Moreabout PBS online sponsorship♪♪ ♪♪ ♪♪ ♪♪ -Today on "America's Test Kitchen," Lan makes Bridget a fool-proof challah, Jack talks about different types of flour, and Erin makes Julia crescent-shaped rugelach with raisin-walnut filling.
It's all coming up right here on "America's Test Kitchen."
♪♪ "America's Test Kitchen" is brought to you by the following.
Plugrà European-style butter was created for all chefs, cooks, and bakers.
Slow-churned with 82% butterfat for a smooth texture and more pliability for flaky crusts.
Plugrà -- from professional kitchens to your home.
Sailing with American Queen Voyages brings you to mighty rivers and unique expeditions, where passionate explorers can discover the continent of North America.
You can learn more about our voyages at AQVoyages.com or contact your travel advisor.
Sur la Table, where you can discover an assortment of provisions for your next meal or gathering, from cookware and tools from a wide variety of kitchen brands to hands-on cooking classes.
Visit us at surlatable.com.
♪♪ -Some bread recipes have a long history baked right in, like challah.
It's revered not only for its religious importance, but also for its flavor, its texture, the beautiful braids and twists.
Now, Lan's here, and she's going to tell us all about her journey to craft a loaf of challah that was respectful of history but approachable enough for the home cook.
-I learned how to make challah by testing a couple of recipes on my own, but also by going to the experts.
Made a trip to Rosenfeld's Bagels in Newton, and there, I met Mike Lombardo.
He's the owner of the bakery, and he and his crew make hundreds of loaves a day.
And what I learned was, you need a dough that makes up nice and tender and plush, but it needs to be firm enough that you can work with it while it's raw.
-That's quite the balance you have there.
-It is, it is, but we have a couple of tricks that we learned here in the test kitchen that we're gonna apply.
-Okay.
-And it starts with these ingredients.
I've got 3 tablespoons of bread flour here, and I'm gonna add 1/2 cup of water.
Whisk them together, and then I'm gonna cook this mixture in the microwave until it becomes a thick paste.
By cooking this mixture, I'm gonna stash that water in the flour.
It'll be there to keep our bread nice and moist when it bakes up, but the dough is gonna be firm and really malleable.
-Okay.
-This technique -- it's called tangzhong.
So I'm gonna cook this mixture until it becomes thick and pudding-like.
That takes 40 to 80 seconds.
I'll stop every 20 to give it a quick whisk so it cooks evenly.
So, nice and thick, clings to the whisk.
I'm going to transfer it to the bowl of our stand mixer.
Since this is hot, I need to cool it down, and I'm gonna do it with some of our remaining ingredients.
I've got 1 whole egg -- and this is a large egg -- 2 large egg yolks, 1/4 cup of water... ...2 tablespoons of vegetable oil, and I'm just gonna whisk everything together.
Now, this does two things -- it cools that tangzhong down so that it won't kill our yeast when we get it in, but it also loosens it up, which makes incorporating it into the rest of the ingredients a lot easier.
-Otherwise, you might have a little dumpling inside your bread.
-Yeah, that would be no good.
-Exactly.
-So, last couple of ingredients.
I've got some bread flour here.
This is 2 3/4 cups, 1 1/4 teaspoons of instant yeast.
You could also use rapid-rise here.
-Okay.
-Just pop this onto our stand mixer.
This usually takes maybe 3 or 4 minutes.
I'm mixing on low, and all I'm going for here is a nicely incorporated mixture.
As long as all the flour's moistened, I don't have any dry spots or wet spots, we're good.
I'm just gonna turn this off.
We'll let this rest for 20 minutes.
This rest, this autolyse, will give the flour time to hydrate.
It's been 20 minutes.
Time to get the last two ingredients in.
I've got 1/4 cup of granulated sugar here and 1 teaspoon of table salt.
Now I'm going to turn this on, and we'll knead at medium speed until the gluten is fully developed.
That usually takes 9 minutes.
-Okay.
-That looks great.
It's nice and elastic.
It looks really smooth.
Just gonna pull it off, and we'll have a quick check.
Gonna give this a quick spray because I'm gonna let the dough rise in this bowl.
No need to dirty anything else.
-Nice.
-I'm just gonna give this a quick knead to bring it together so it's nice and smooth, and you can see that you don't need any flour.
It's not sticking to anything.
Right in the bowl.
I really want to make sure that the surface doesn't dry out, so I'm gonna give it a quick spritz and cover with plastic.
It's gonna rise until it's about doubled in size.
It's about 1 1/2 hours, depending on how warm your kitchen is, and it's just gonna do its thing.
-Okay.
-Bridget, it has been an hour and a half.
This dough has doubled in size.
It's time to braid.
-Alright.
-First thing, I'm gonna divide it into four equal pieces, and I'm gonna do that by pressing it first into an 8-inch square.
And while I'm doing this, I'm keeping an eye out for air bubbles.
Something like that will quadruple in size, and you'll end up with a hole in your challah, which we do not want.
-No one wants a hole in their challah.
-[ Chuckles ] Nope.
I am looking for an 8-inch square.
Great.
So now we're gonna divide this first in half... and then in half again to get four strips.
-Okay.
-I am making a four-strand braid.
I'm going to roll this into 16-inch-long ropes, and once I get it to 16 inches, I'm gonna extend it by another 2, tapering the ends.
I'm using this portion of my hands to just extend the ends a tiny bit 'til I get to 18 and the ends are nicely tapered.
-Okay.
-This will get me a nicely shaped finished loaf.
-Okay.
-So I'm gonna repeat that with the rest of my dough.
Now we get to the braid.
-Alright.
-We're gonna actually make a plus sign with our strands, and we're gonna let the tips overlap by about 1/2 inch.
Now, I think of this as kind of a clock.
Press this down so that that portion stays put and doesn't move around as we braid.
You're gonna want to take the 12:00 strand down to 5:00.
This 6:00 strand goes up to 12:00... 9:00 to 4:00... and 3:00 to 8:00.
And that is our first set of braids.
-And you end up with an octopus.
-[ Chuckles ] Almost.
I will go ahead and neat these so that they are perpendicular and parallel to me again.
So again, it's 12:00 to 5:00, 6:00 to 12:00, 9:00 to 4:00, and 3:00 to 8:00.
Straighten...and one more time.
Down, up, over, over.
And I'm gonna bring that down.
Tuck all of these ends together and give them a nice pinch.
-Look how cute that is!
-Tuck our ends underneath.
And here's our challah.
-Oh, my goodness.
-How great is that?
-That was kind of unbelievable.
-It's so simple, and it makes you feel like a pro because that's a complicated-looking braid.
-It really is.
-We'll just put this onto a sheet of parchment that is on 2 rimmed baking sheets.
The bottom of this loaf tends to brown a little bit too fast.
By stacking my baking sheets and creating a tiny gap of air that acts as an insulator, it slows down the browning of the bottom just enough.
Last thing, I want to cover it while it rises.
That's going to help it rise more evenly.
If I didn't cover it, the exterior would dry out, and then you'd get some cracking.
It wouldn't be very attractive.
This is gonna double in size, and so you want to make sure the plastic wrap is draped really loosely over the top so that it doesn't hold the dough in place or mush it into weird shapes.
-Okay.
-But that's it.
We're gonna let this hang for about three hours.
♪♪ Bridget, it's been three hours, and you can see this has expanded quite a lot.
It's about doubled in size.
-Exactly.
That is beautiful -- before it goes into the oven.
-Yes, but it's gonna be even better when it comes out.
I'm gonna do a quick test to make sure that it is fully proofed and ready to go in.
Gonna go in and gently press with my knuckle, and what I want to see is that it springs back a little bit but not all the way.
-But not all the way.
-I've got 1 egg here.
I'm gonna add a pinch of salt... and just beat that together.
And I really want to take my time doing this to get into all the little nooks and crannies.
The egg-washed portions are really glossy and beautiful, and the un-egg-washed portions are a little bit matte.
-Yeah, that's one of the hallmarks of a good challah is it's that beautiful lacquered appearance.
-Yeah, it's just so appealing.
But you could also use this egg wash as a glue and sprinkle, say, a tablespoon of poppy seeds or sesame seeds right on top, if that's your jam.
I think this looks pretty great.
-You have done very well.
-I'm gonna bake this in a 350-degree oven on the middle rack until it is deeply browned.
That takes 35 to 40 minutes.
-Oh, wow.
-Right?
Gorgeous.
-Wow!
Look at that.
[ Gasps ] It is so beautiful.
-It's got a beautiful, deep golden-brown color, only took maybe 35 minutes to get there.
Just to be sure, I'm gonna take the temperature of this bread.
I'm looking for it to be anywhere above 195 degrees.
Bridget, nailed it.
So I'm gonna let this rest for about 20 minutes on this rack.
It'll be just cool enough to handle.
Then I'll transfer it to the wire rack, where it will cool the rest of the way.
That takes about 2 hours.
It's finally cooled.
Let's dig in.
-Oh, look at that crumb inside.
I mean, it is so plush.
-It's pillowy and tender.
-Oh, it smells so good, too.
-Just a hint of sweetness.
-Mmm!
Mmm.
There's beautiful development in here, though, the gluten and the structure.
If you'd used all-purpose flour, you would have had a flat loaf.
-Yeah, this will hold up to some custard, whether you're in a French toast or a bread pudding, but it's not tough.
-Mm, mnh-mnh.
And it looks like you have a little different braid going on there.
-Yeah, I couldn't stop with the braids, and there's actually a really simple method to create a round loaf.
-You can get instructions for that on our website.
Thanks, Lan.
I am definitely going to make this at home.
-I can't wait to see yours.
-So if you want to make this beautiful loaf of challah at home, cook a little water and flour together to make a paste, use our unconventional braiding method for a taller loaf, and bake the bread on 2 stacked baking sheets.
So from "America's Test Kitchen," an incredibly approachable yet velvety, tender, plush, easy-braid challah.
And delicious.
♪♪ -It's hard to think of an ingredient more important in the kitchen than flour.
Without flour, there's no fried chicken, there's no Thanksgiving gravy, and there's no birthday cake.
So here's what you need to know about flour.
Let's start with flour in its most natural, simplest form, which is whole-wheat flour, I have here in front of me.
It has a nice, tawny color that you can see.
It's ground from the whole grain.
This has the bran as well as the germ.
We use it in a lot of recipes specially formulated for whole-wheat flour because it absorbs liquid differently.
You can -- that said -- replace a little bit of the all-purpose flour in a favorite recipe with whole wheat.
No more than 50% or you may have textural problems.
So next up, of course, all-purpose, and as the name implies, all-purpose does it all, from cakes and cookies to pie dough.
We have two options here.
If you don't make a lot of bread, you may want to go with the test kitchen favorite.
This is the Gold Medal.
It has a protein content of 10 1/2%, and basically, more protein means more chew when you're making breads.
Now, if you're somebody who bakes some bread and only want to keep one flour on hand, I'd probably go with the other test kitchen favorite.
This is the King Arthur.
Rather than 10.5, it has 11.7% protein content, so it does a little better in those chewy breads.
Now, if you're a serious bread baker, you're gonna want to keep all-purpose flour as well as a dedicated bread flour, because the protein content here is 12.7%, a lot higher than all-purpose, and if you want to make ciabatta or sourdough, you really need bread flour.
Finally, cake flour.
It's got a much finer texture.
We like bleached cake flour because it absorbs liquid a little bit better.
Protein content there is just 6% to 8%.
Lastly, I want to talk to you about measuring.
Now, I know you read a recipe, and our recipes do call for cups, and you think it's fine to just use a cup.
I'm gonna tell you, nobody here uses cups in the test kitchen.
Unh-unh.
It's not that accurate.
I'm gonna explain to you why.
Our preferred method is called the dip and sweep.
So you dip the cup.
I've got too much in here.
I then sweep off the excess.
Ideally, 1 cup weighs 5 ounces.
And I only have 4.8, and you're thinking, "Hey, that's not so bad."
The problem is, what if it's 2 cups of flour or 3 cups of flour or 4 cups of flour?
And now suddenly, I'm an ounce short, or if I was an aggressive dipper, maybe I've got an ounce too much, and the texture of the baked good is totally thrown off.
So please, do yourself a favor.
Do me a favor.
Next time you're making a baked good, put away the measuring cups and get out your scale.
Thank you.
♪♪ -Rugelach, those delicate rolled cookies popular in Jewish bakeries all over the world, come in two distinct styles.
Now, one style is based on a yeast dough and it has more of a bread-like texture, while the other, which is more popular here in the US, is based on a cookie-like dough that's enriched with cream cheese, and that's the style that Erin's gonna make for us today.
-Absolutely, Julia.
It's gonna be fun.
So what we're making is basically, almost like a cross between a cookie and pastry, and so you have a lightly sweetened dough that's gonna be wrapped around a lot of fillings.
So jam, nuts, chocolate sometimes.
Like, you can put anything in these, and they're fabulous.
-Great.
-We're gonna start over here, and as you can see, I have a food processor.
We want to have a flaky your texture, so we're gonna actually use a food processor where the blade cuts the fat in, much like a pie dough.
So I have 11 1/4 ounces of all-purpose flour.
I'm gonna add 1 1/2 tablespoons of sugar, and now I'm gonna add 1/4 teaspoon of salt.
You need salt.
The salt helps to bring out all the flavors.
Don't skip the salt.
Now I'm gonna pulse this just to combine the ingredients.
So we have 2 sticks of unsalted butter.
They're quarter-inch-sized pieces.
Now I'm adding 8 ounces of cream cheese.
This cream cheese is gonna tenderize the dough, and it's also gonna add a little tang.
And last but not least, 2 tablespoons of sour cream.
Again, this is gonna add a little bit of acid and tang and help to tenderize the dough.
Now we're gonna cut the fat into the flour, so I'm gonna pulse this about 16 to 20 times.
Pulsing is the key here, and count.
Alright?
-[ Chuckles ] -What we're looking for is the mixture to turn into the consistency of damp crumbs.
If it turns into a dough, you've gone too far.
I'm gonna give it a test.
You want it to definitely be pulsed enough, so your test is to just pinch it together to see if it comes together.
So now just gonna dump this onto the counter.
Alright, so now we're really going to kind of pull it together and press it together, and I'm just gonna do it in a couple of times.
-Wow.
-At first, it appears like there's no hope.
-[ Laughs ] -So we cut the butter in, but we still had little, tiny pieces.
And by just kind of pushing it around and massaging it, you're just kind of smearing that, and that's gonna give us even more flakes in our cookies.
So I'm just pressing this into a 9-inch log.
So I'm gonna cut this into quarters.
-Alright.
-So you're just kind of pulling it together.
-Like a pie dough.
-Yeah, and just kind of press it.
We don't want to overwork it, but we want it to come together into a 4 1/2-inch disk.
-Okay.
-Okay.
So we have all of our 4 disks, and they're looking relatively equal in size.
-Mm-hmm.
-Now it's time to roll them out.
-Okay.
-And you're gonna help me.
-Okay.
-Hint, hint.
I gave you a rolling pin and everything.
-I like helping.
-So we're gonna roll these out in between plastic.
-Alright.
-We're gonna roll this into a 9-inch circle.
I know typically, usually you roll things out between parchment paper, and you can do that, but you really have more control when using plastic wrap because you can actually see it and adjust as you go.
It's important to make sure, as with any dough that you roll out, you want it to be even, so I always like to run my hand over it because often, the center will be more rolled out around the edges, and you just want to make sure that it's even.
There we have it.
So now we're just gonna take the plastic wrap off the top piece.
Top this with a piece of parchment paper, and then this is, like, the fun part.
At least I have fun doing it.
-[ Chuckles ] It is kind of fun.
-That looks great.
-Yeah.
-Now I'm just gonna put this on a plate.
You're gonna put yours right on top of mine.
-Okay.
Alright.
-Are you up for another one?
-Oh, yeah.
-Excellent.
Once these are rolled out, we're gonna put all four rounds into the freezer for 30 minutes.
-Okeydoke.
-We are just about ready to roll.
Ready to roll?
-Am I ready to roll?
-Are you ready to roll?
You're always ready to roll.
So we're gonna start off with 2/3 a cup apricot preserves.
I have my dirty food-processor bowl.
-You sure do.
-You don't need to clean it.
Alright, so now we're gonna process this until it's smooth -- about 10 seconds.
Smells good.
-It does smell good.
-So now we have our smooth preserves.
-Nice.
-Okay.
Next up, we have 1 cup of sugar.
-Mm-hmm.
-And we're gonna spike it with a tablespoon of cinnamon.
-Ooh, that's a strong cinnamon sugar.
-Yes, it is.
So, I'm gonna go grab the frozen rounds.
Alright, so we have our 30-minute-chilled rounds.
-Okay.
-You want to fill one with me?
-Yes, absolutely.
-You just want to loosen it from the parchment.
-Okay.
-And then put it back on the parchment.
-Alright.
-And that's it.
Now we are going to start with our apricot preserves.
I'm gonna add 2 1/2 tablespoons of apricot preserves to the center.
We're just gonna spread this around.
This is gonna be kind of like the glue for all of our other ingredients.
Okay, so you're spreading it almost all the way to the edge, but leaving about 1/4-inch border, which will make it a little easier for you to roll.
-Alright.
-Right.
Next up, our spiked cinnamon sugar.
So now we're gonna add 2 tablespoons and sprinkle it over the preserves.
We have golden raisins here, 1 cup, and we have 2 cups of finely chopped walnuts.
-Nice.
-So we're each gonna take 1/4 cup of golden raisins.
Next up, we're gonna add 1/2 cup of finely chopped walnuts.
Now, this is gonna be like the blanket.
-Alright.
-And now the next step here is we're gonna actually press them in.
That's it.
Not a lot.
So we're gonna cut these into 8 pieces.
You have a chef knife over there?
-I do.
-Perfect.
So just cut nice wedges.
-Do you go in half first?
-I do half, yep.
-Alright.
I think I got it.
-And now grab your large offset spatula, and the goal here is to just slip it under there, pull it out.
-Okay.
-Okay, so now we're gonna roll.
-Okay.
-You want to roll tightly, but you don't want to squeeze all the filling out.
So it's like a nice balance.
-Alright.
-So, some will fall out, but it's okay.
So start at the thicker end, and roll her up.
And then transfer it to parchment paper, and I like to put the point so it's right underneath the whole cookie.
And the ends I like to grab and kind of tuck them down so it's a crescent shape.
Alright.
Here's my last one.
How are you doing over there?
-I'm good.
-Those look great, Julia.
-Thank you.
I've got better as I went along, that's for sure.
-So these are the crescent shape, and I can also make a rugelach shape.
-Oh, nice.
So you can find both that alternate shaping method and a few other variations on the filling at our website.
-Absolutely.
So you're up for rolling the next round?
-You bet.
-Okay, so once we roll them and fill them and shape them, we're gonna freeze them for 15 minutes, but you can also freeze them for up to six weeks if you want.
♪♪ Alright, Julia, so these have frozen for 15 minutes.
-Mm-hmm.
-The next step before they go into the oven is to brush them with an egg wash, so I made an egg wash with 2 yolks and 2 tablespoons of milk.
-Okay.
-And we're just gonna brush them all over, get the ends.
-Should I be careful not to get it on the parchment?
'Cause I can tell you right now, I'm getting it on the parchment.
-Some dribbles are totally fine.
-Okay.
-Absolutely.
So don't forget the backs and the fronts and the two tails.
We're gonna bake these in an oven that is heated to 375 degrees on the upper-middle and lower-middle racks, and we're gonna rotate them halfway through.
They're going to take about 21 to 23 minutes.
-Mmm.
Oh!
-Beautiful.
-Erin, they're gorgeous.
-Can hear the sizzle.
-You can see the sizzle.
-Absolutely.
So one more step.
We're gonna take the leftover cinnamon sugar.
We're gonna take about a scant teaspoon and sprinkle it on each cookie as we go.
-Wow.
Okay.
-So while they're hot.
You want to do it while they're hot.
-Right, so that way, some of the sugar can melt into the dough.
-You got it.
Yep.
Now that they have sugar, we're gonna transfer them from the tray to our cooling rack.
-Okay.
-And it's a lot easier to do it while they're hot.
Okay, so we're just gonna let this cool completely, and then we can dive right in.
It's time.
It's time.
-I love that it's a nice, big platter.
-Absolutely.
-Alright.
I just got to break this open.
Oh, look at that.
You can see the flakes of dough on the outside of the cookie.
-Yep.
-You can see those flakes, but it didn't crumble apart in my hands.
It's holding together.
-Yep.
Absolutely.
-Mmm.
-Mmm.
-Mm-hmm.
So good.
You can taste all the individual ingredients from the filling, but it's a very cohesive, complex flavor.
And the dough, the crust -- it's part cookie, part pie dough.
-Yeah.
-It is the perfect marriage of all these textures.
-It's very bright, sweet, nutty, rich, flaky, crispy, crunchy...tender.
-Erin, this really was fun to make.
Thank you.
-Absolutely.
You're welcome.
This was a lot of fun.
-To make perfectly tender rugelach, make the dough in a food processor using butter, cream cheese, and sour cream.
Freeze the dough before shaping, then fill it and freeze again before baking.
From "America's Test Kitchen," a satisfying recipe for rugelach.
You can find this recipe and all the recipes and product reviews from this season, along with select episodes, at our website, americastestkitchen.com/tv.
[ Chuckles ] Visit our website, where you can sign up for our free e-mail newsletter for even more of the recipes and stories you love from all of our cast and cooks.
AmericasTestKitchen.com/TV.
From the cooks and editors of "America's Test Kitchen," Cook's Illustrated Magazine has been all about the why and how of cooking for over 30 years.
Get a year of award-winning reporting, science-based discoveries, trusted reviews, and more.
The cost is $19.95.
That's 63% less than the cover price.
To subscribe, scan the QR code on your screen, or visit CooksIllustrated.com/ TVsubscribe.
"America's Test Kitchen" is brought to you by the following.
Plugrà European-style butter was created for all chefs, cooks, and bakers.
Slow-churned with 82% butterfat for a smooth texture and more pliability for flaky crusts.
Plugrà -- from professional kitchens to your home.
Sailing with American Queen Voyages brings you to mighty rivers and unique expeditions, where passionate explorers can discover the continent of North America.
You can learn more about our voyages at AQVoyages.com or contact your travel advisor.
Sur la Table, where you can discover an assortment of provisions for your next meal or gathering, from cookware and tools from a wide variety of kitchen brands to hands-on cooking classes.
Visit us at surlatable.com.
♪♪ ♪♪ ♪♪ ♪♪ ♪♪ ♪♪

- Food
Christopher Kimball’s Milk Street Television
Transform home cooking with the editors of Christopher Kimball’s Milk Street Magazine.


Support for PBS provided by:
America's Test Kitchen is presented by your local public television station.
Distributed nationally by American Public Television